第三方组件库扩展
除了 React Native 官方提供的组件,团队一般都会有自己的UI组件库。
此外,有很多优秀的第三方组件比如:ScrollableTabView, ViewPager等,如何把使用了这些组件的 React Native 应用转化为微信小程序呢?
我们把这些组件分成两类,第一类符合alita规范,未违反alita限制参考, 可以直接转化。 第二类不符合alita规范,或者调用了原生代码,或者组件本身就需要区分平台等等原因,这一类需要手动转化。
自动处理
首先 对于第一类可以直接转化的组件,只需要在配置文件include字段指定即可,比如案例HelloWorldRN项目下@areslabs/hello-rn组件的使用
const path = require('path')

module.exports = {
    entry: "./src/index.js",
    output: "./wx-dist",

    include:[
        path.resolve('src'),
        path.resolve('node_modules', '@areslabs', 'hello-rn')
    ],
}
alita使用的是webpack打包的方式,在引擎内部会提供多个loader,上面这个include字段的配置,效果等效如下:
module.exports = {


    module: {
        rules: [
            {
                test: /\.js$/,

                include:[
                        path.resolve('src'),
                        path.resolve('node_modules', '@areslabs', 'hello-rn')
                 ],

                use: [
                    {
                        loader: 'alita-loader',
                        。。。
                    }
                ]
            }
        ]
    }
}
同理,还有exclude字段。 作用机制是一样的。详情参考webpack
手动对齐
当使用的第三方组件有如下的要求的时候:
- 微信小程序端的展示和RN端本身就是不同的
- 使用了RN原生API/组件等,如动画API
- 原生扩展的组件
- 需要更强的对组件的控制
- 相比自动转化的微弱性能优势
- 其他原因
react-native官方组件,就是这种方式处理的,可以参考其代码wx-react-native,我们即将发布的跨端组件库alita-ui也是采用的这种方式。
类比RN给IOS, Android扩展原生功能一样,手动对齐就是用小程序原生能力编写一个组件/API。手动对齐对组件有了更强更细的控制,不过组件最终的能力还是取决并受限与微信小程序平台能力。
下面以react-native的Button组件为例说明, Button组件接收title属性,onPress回调。
<Button title="..." onPress={this.handlePress}/>
我们用小程序的组件/API定义一个自定义组件button
index.wxml
<view bindtap="innerPress">
    {{title}}
</view>
index.js
Component({
    properties: {
        title: null
    },

    methods: {
        innerPress: function () {
            // 执行 onPress回掉函数
        }
    },
})
很简单明了的一个小程序自定义button组件,不过这里的title,innerPress都是由上层React环境决定的。
小程序如何获取React层的数据呢?
React层代理
小程序的js文件,无法直接在React层运行,需要提供一个上层button的代理,这个代理将代替小程序button组件在React层运行
import {RNBaseComponent} from '@areslabs/wx-react'

export default class Button extends RNBaseComponent{

    getStyle(props) {
        return {
            // Button 不接受style属性
            style: this.transformViewStyle('')
        }
    }
}
代理的代码很简单, 主要有两部分。
- 继承自
RNBaseComponent - 提供
getStyle方法。 关于这里的getStyle将会在下面 自定义组件样式的差异 章节详细解释
import {Button} from 'react-native' 在小程序平台导入的其实是这个代理文件。
路径映射配置
以上文件建立好之后,需要把button和button代理建立对应关系,一般需要在对应包的package.json文件的wxComponents
字段指定。对于每一个组件包,alita会特殊处理package.json的wxComponents字段。
wxComponents 有path, components两个字段, path表明小程序自定义组件所在目录,这个目录会被copy到最终的小程序源码之中。
components字段指定了包 导出的所有组件名称和路径。
比如RN官方组件映射库@areslabs/wx-react-native的目录结构如下:
.
├── src
│   ├── component
│   │   ├── Button
│   │   │   └── index.js        <--- 代理Button文件
│   │   ├── FlatList
│   │       └── index.js        <--- 代理FlatList文件
│   │
│   └── index.js                <--- 实际导出 Button, FlatList
│
└── wxcomps                     <---  wxComponents path字段指定路径
    ├── Button                  <--- 小程序自定义button组件
    │   ├── index.js
    │   ├── index.json
    │   ├── index.wxml
    │   └── index.wxss
    │
    ├── FlatList                <--- 小程序自定义FlatList组件
    │   ├── index.js
    │   ├── index.json
    │   ├── index.wxml
    │   └── index.wxss
其package.json如下:
{
  "name": "@areslabs/wx-react-native",
  "version": "2.0.0",
  "scripts": {},
  "dependencies": {},
  "devDependencies": {},
  "wxComponents": {
       "path": "wxcomps",   //<---- 指定小程序组件目录
       "components": [
           {
               "name": "Button",
               "path": "Button/index"
           },
           {
                "name": "FlatList",
                "path": "FlatList/index"
           },
           ...
       ]
  }
}
映射配置之后,React层的代理和小程序自定义组件就建立起了一一对应的关系。 当有其他组件使用了Button之后,会在小程序json文件生成如下记录:
{
    "component": true,
    "usingComponents": {
        "Button": "@areslabs/wx-react-native/wxcomps/Button/index"
    }
}
wx.__bridge.reactCompHelper
下面我们谈一下 wx.__bridge.reactCompHelper这个API,这个API赋予了小程序层获取/操作React层数据的能力。首先把小程序组件的button.js 修改如下:
Component(wx.__bridge.reactCompHelper({
    properties: {
        title: null
    },

    methods: {
        innerPress: function () {
            this.data.onPress && this.data.onPress()
        }
    },
}))
很简单,只需要在创建小程序组件的时候,使用了wx.__bridge.reactCompHelper包裹,它将会提供小程序组件和上层React交互的能力,具体的:
注入相应所有属性值,包括方法,如这里的title,onPress等。
可以调用
this.getReactComp()获取"代理"实例,进而实现更多的交互, 如ref等
至此,Button组件就可以运行在小程序平台了。
如果你有一个自定义组件UI库,那么只要你对其中的组件都进行如上的操作,那么你的UI组件库就不仅可以运行在RN,也 可以运行在小程序平台了。
当然你如果有小程序组件库,通过wx.__bridge.reactCompHelper稍加改造,也可以让其和Alita友好结合。
第三方组件库的扩展,还涉及到另外一个比较麻烦的问题,就是样式,RN和小程序样式大体相同却仍有区别。下面我们具体谈一下这个方面,这也是上面 代理js中getStyle 需要解决的问题。
自定义组件样式的差异
首先对于大部分常见的组件,getStyle都可以定义如下
export default class XXX extends RNBaseComponent{
    getStyle(props) {
        return {
            style: this.transformViewStyle(props.style)
        }
    }
}
style: transformViewStyle(props.style) 表示这里XXX组件的样式表现形式就是像View组件一样,且可以被style属性控制。
感觉有点废话,不过,的确有一些组件的style并不是如上的简单关系。下面解释一下这里的具体原因。
先看一下@areslabs/Hi-RN组件,其RN代码如下
import React from 'react'
import {View, Text, Animated, StyleSheet} from 'react-native'


export default class Hi extends React.Component {

    state = {
        fadeAnim: new Animated.Value(1)
    }

    componentDidMount() {
        Animated.timing(
            this.state.fadeAnim,
            {
                toValue: 0,
                duration: 5000,
            }
        ).start();
    }

    render() {
        return (
            <View
                style={[this.props.style, styles.container]}
            >
                <Animated.Text
                    style={{
                        ...this.props.textStyle,
                        opacity: this.state.fadeAnim,
                    }}
                >Hi {this.props.name}!</Animated.Text>
            </View>
        )
    }
}


const styles = StyleSheet.create({
    container: {
        borderWidth: 2,
        backgroundColor: 'yellow',
    }
})
这个组件使用了 RN原生的动画,所以没有办法直接通过Alita自动转化,你当然可以把它修改为wx-animated的形式,然后自动转化。不过这里我们主要通过手动处理的方式来说明getStyle
看一下其"代理"文件
import {RNBaseComponent} from '@areslabs/wx-react'


export default class Hi extends RNBaseComponent{
    getStyle(props) {
        return {
            style: this.transformViewStyle([props.style, styles.container]),
            textStyle: this.transformStyle(props.textStyle),
        }
    }
}

const styles = {
    container: {
        borderWidth: 2,
        backgroundColor: 'yellow',
    }
}
其wxml文件
<block>
    <view
        animation="{{ani}}"
        style="{{textStyle}}"
        bindtap="handlePress"
    >
        Hi {{name}}!
    </view>
</block>
其js文件
Component(wx.__bridge.reactCompHelper({
    properties: {
        name: null,
        textStyle: null,
    },

    data: {
        ani: {}
    },

    ready() {
        var ani =  wx.createAnimation({
            duration: 5000,
            timingFunction: 'linear'
        })
        ani.opacity(0).step()

        this.setData({
            ani: ani,
        })
    }
}));
这个小程序组件,首先是动画的处理,在小程序组件里面通过ready生命周期调用了自己的动画API,实现了 渐隐效果。此外注意看wxml部分,wxml里面并没有看到对style的处理,最外层直接使用了一个block。
为何我们没有使用如下的style形式而是使用了一个没有实际意义的block呢?
<view style="{{style}}">
    <view
        animation="{{ani}}"
        style="{{textStyle}}"
        bindtap="handlePress"
    >
        Hi {{name}}!
    </view>
</view>
原因是,小程序的style属性是传递不了的, 也就是你在自定义组件<XXX style=".."/>, XXX内部无论
properties如何定义,都是取不到的, 名为style的属性被小程序引擎直接屏蔽了。 也就是组件内部取不到外部的style属性值。另外还有一个更加重要的原因。
我们先看一个事实。
class Y {
    render() {
        return (
            <View style={{flex: 1}}>Y</View>
        )
    }
}
class X {

    render() {
        return (
            <View style={{height: 300}}>
                 <Y/>
                 <Y/>
            </View>
        )
    }
}
对于如上的结构组件,在React 实际渲染之后,实际如下:
<View>
   <View style={{flex: 1}}>Y</View>
   <View style={{flex: 1}}>Y</View>
</View>
其中X, Y组件只存在JS阶段,不存在与实际渲染。由于都是flex:1这里的两个Y将平分300的高度。
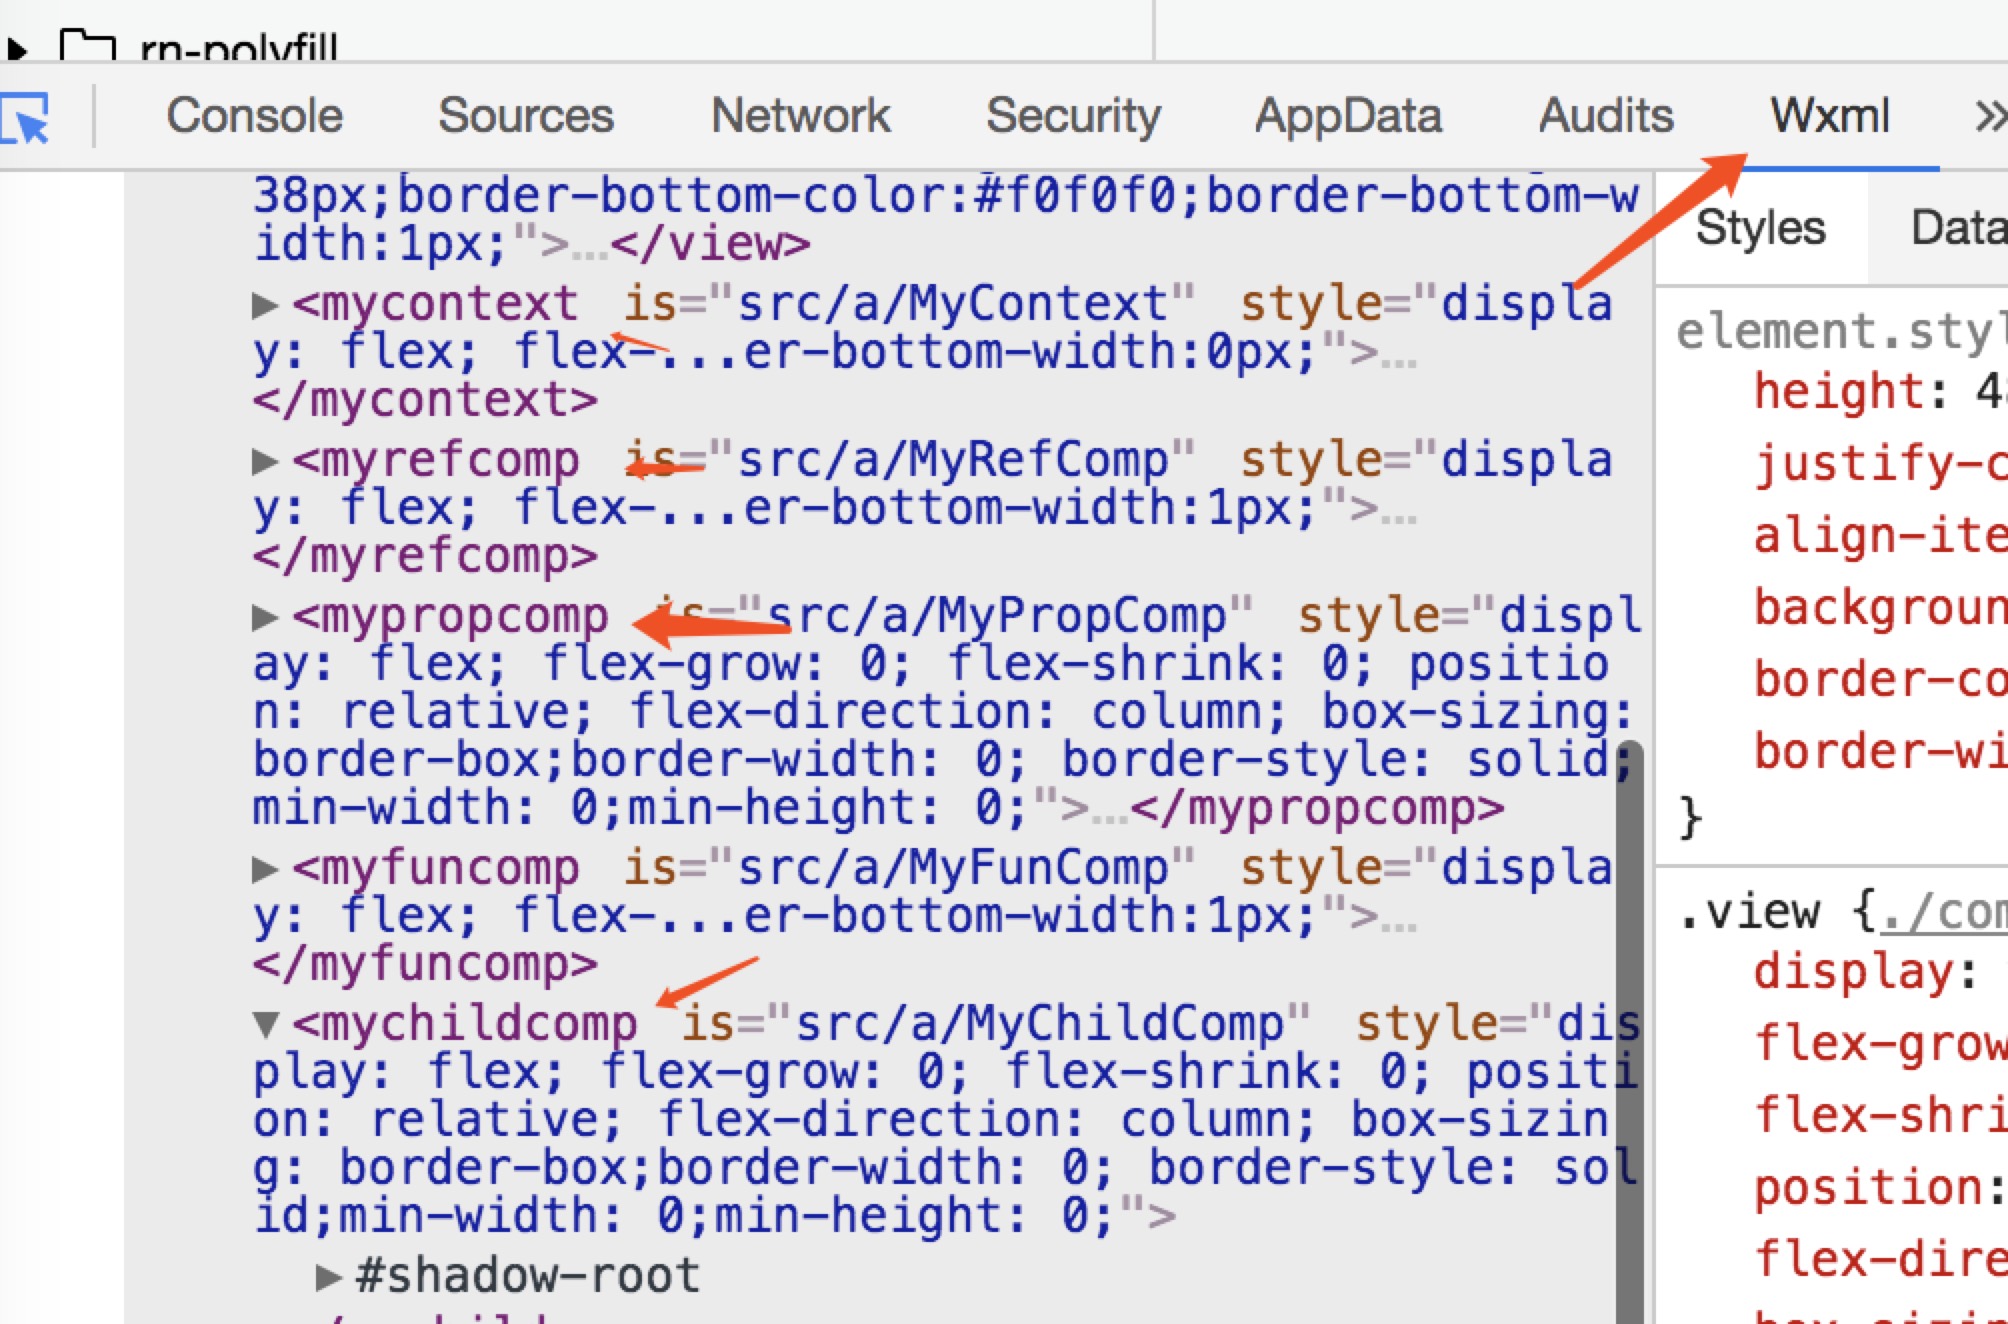
但是微信小程序不是,小程序的自定义组件会退化为一个没有样式的节点:

上图是一个实际的微信小程序节点结构,可以看出其自定义节点并没有消失,而是退化为了一个节点。
可见,在微信小程序上实际渲染出来的结构如下:
<View>
    <Y>
       <View style={{flex: 1}}>Y</View>
    </Y>
    <Y>
       <View style={{flex: 1}}>Y</VIew>
    </Y>
</View>
这里多出了一层节点Y,由于样式flex: 1在内部节点View上,这里的两个Y高度将表现的与RN不一致。
也就是说: <XXX style="..."/> 在RN平台, 这个style指定的值,由XXX内部逻辑决定,可以做
上面HI-RN的聚合[this.props.style, styles.container], 甚至可以直接丢弃。 但是请注意在小程序平台
这个style直接就设置到XXX退化的节点上了。为了处理这个问题,Alita会接管所有style属性值的处理,保证在小程序
平台设置给XXX组件的样式逻辑可以定制。这就是getStyle的作用,比如上面的HI-RN组件
import {RNBaseComponent} from '@areslabs/wx-react'


export default class Hi extends RNBaseComponent{
    getStyle(props) {
        return {
            style: this.transformViewStyle([props.style, styles.container]),
            ...
        }
    }
}

const styles = {
    container: {
        borderWidth: 2,
        backgroundColor: 'yellow',
    }
}
getStyle方法接收props参数,而其具体实现,完全可以参考RN组件外部View的style属性。transformViewStyle
将RN对象/数组形式的样式值,转化为等效对应的字符串形式,这个转化也会抹平RN和小程序样式差异。
除了transformViewStyle, RNBaseComponent一共提供有
- transformViewStyle
- transformTextStyle
- transformScrollViewStyle
- transformStyle
- getWxInst 获取底层小程序实例
对于手动处理使用到的小程序组件view, text,image等,默认会有如下的RN等效默认值
view, image, scroll-view {
    display: flex;
    flex-direction: column;
    position: relative;
    box-sizing: border-box;
    border: 0 solid;
    min-width: 0;
    min-height: 0;
}
所以里面节点的样式使用transformStyle 即可,如这里的textStyle属性
同时组件样式已经由外层退化节点接收,内部的View就可以替换为block了
<block>
    <view
        animation="{{ani}}"
        style="{{textStyle}}"
        bindtap="handlePress"
    >
        Hi {{name}}!
    </view>
</block>